Die Tasten vorne sind im originalen Gotekgehäuse etwas kurz, d.h. da werde ich die Gehäuse mit den Drehknöpfen nachrüsten.
Bei einer erneuten Bestellung von aufgebauten Platinen, würde ich den Speaker, die Tasten und die LEDs nicht bestücken lassen und dann selbständig nachtragen.
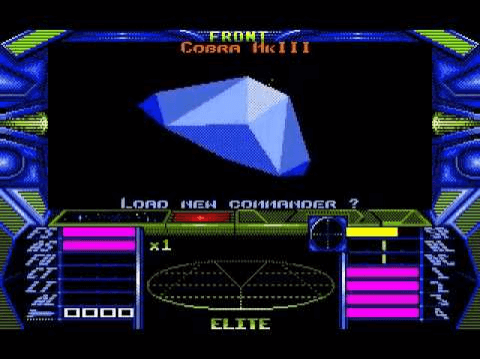
Elite tips & tricks (provided by keili, translation by ssb)
The goal of Elite is to reach the rank of ELITE as soon as possible.
To reach this goal there are 5 missions in the game that the player should accept and fulfill in order to become ELITE. It is evident that the player should be fully able to fly the Cobra MKIII in any situation. Make sure you have installed the following equipment before attempting the first mission:
military laser front and aft
ECM
docking computer
energy unit
fuel scoop (NOTE: Always useful to add cargo and fuel to your ship!)
intergalactic hyperdrive
1. Mission: Search’n’Destroy the Constrictor
This mission will lead you through several galaxies. While chasing the Constrictor craft, you’ll get a next destination communique at every station you dock. Visit these systems one after another. As soon as you have found the Constrictor, it will appear as a Thargoid ship on your radar. Take care as the Constrictor has awesome firepower – about the same as a Thargoid so beware. Destroy the Constrictor and dock to the next station to gain a reward of 10000 credits.
NOTE: I think I’ve read somewhere that one can collect equipment from the blasted Constrictor. However as far as I remember all I could get into my hold were computers I could sell.
2. Mission: Transport vital and secret Thargoid documents
The player needs fiercy tactics to hold out and survive. It is helpful to equip your ship with retro rockets.
As soon as you have the documents, only Thargoids will attack you from now on. NOTE: And up to 4 of them at a time!
The best tactic is to point your ship’s aft at the planet, use the retrorockets and fire at the Thargoid ships to keep them at bay. Use the docking computer as soon as possible (in FAST mode I add).
Transfer the documents. You will gain a Naval Energy Unit that will charge your energy as twice as fast as the normal unit.
3. Mission: Save a station crew from a supernova
You cannot get this mission at a station. The player has to look for it himself.
Look for your Elite Score. Around 270000 points, you should lookout for mission 3. Look on the local star chart for a star that is going to become a Supernova soon. Find and fly to it. The message “Fuel leak” will appear. Fly to the sun and scope up fuel.
Now fly to the station and pick up the people there. Launch and immediately jump to a target system. The sun will go supernova in 15 seconds so you have to be fast. At successful docking somewhere else you’ll get a reward of 1kg of gem stones. NOTE: Normally you buy those in gram quantities
4. Mission: Search’n’Destroy the Cougar
When you enter a space station, you will be told that there is a special ship in orbit which can cloak itself and jam other ship’s systems. The player can decide if he wants to fulfil this mission. You are not forced to accept it. However it is impossible to reach ELITE without blasting the Cougar.
To find the Cougar, point your ship at the sun and use the short distance jump. You’ll detect 3 ships on your scanner then. The Cougar and with 98% probability two Asp MKII.
Blast the ASPs with an energy bomb and, important, use the retro rockets. Target the cougar and open fire. Use the retro rockets when the Cougar opens fire. Stop firing as soon as the Cougar explodes or you will destroy precious cargo containers. Use the fuel scoop to collect the containers and get the cloaking device. Use key ‘Z’ to activate the cloak. (NOTE: I don’t know for which keyboard layout that goes, I assume German one but would try out anyway.) It takes a lot of energy to cloak so choose wisely when to activate it.
5. Mission: Destroy a station invaded by Thargoids
Someday you’ll get a message that the Thargoids have started to invade the galaxy. Make sure your Cobra is fully equipped with the cloaking device, 4 rockets, military lasers, naval energy unit and enough fuel to run.
From now on, all orbital statations are occupied by Thargoids. Their appearance will alter as well. Fly to a planet with a high industrial rating (12 or so). On your way, Thargoids will attack you so it might be useful to reuse your tactics from the documents mission.
Use missiles to destroy the station when in range. Thargoid occupied stations have no ECM fitted. Make sure the station has been destroyed. You will gain an ECM jammer that will deactivate ECM systems on other ships. Press ‘L’ to actviate the jammer.
NOTE: I suppose one has to fill up at the sun in order to leave the system as you will destroy the only station.
Generic notes:
In a “Drive malfunction” situation, you are in deep trouble. Keep the Thargoids at bay while your systems will be repaired automatically. Select a new hyperspace destination and attempt to hyperspace after 5-10mins. Sooner or later the drive will work again.
Later in the game it is wise not to use the escape pod. You will use all your ELITE score to go for the next mission. The score will still display but you will have to collect as much points again. Next mission every 90000 points so if you have 80000 and use the escape pod, you’ll have to make 180000 for the mission. Destroy enemy ships to gain score.
Do not buy the cute Trumbles. They will breed and occupy your cargo hold. Fly to the sun to roast them in order to make a ball of furs out of them. That is a rumor and noone will guarantee it will work.
[…]
To the beginner, the following ships are dangerous and mostly deadly: (Target them and press ‘I’ to get a ship ID)
Asp MKII
Wolf MKII
Thargoid
They are deadly in 90% of all cases so save your game everytime you dock!
NOTE: I personally don’t think the Asp is that dangerous. Beware of Geckos, I think those are more deadly. You can kill an Asp with a missile which won’t work on Geckos.
If a Thargoid spreads small daugther ships, you will be able to scoop them up to get “Alien Items” in your cargo hold.
….
Some more personal tips by Simon Sunnyboy:
Do not attempt piracy in democracy or corporate state worlds. Choose Feudal or Anarchy.
Do not shoot space stations. You won’t be allowed to dock with the computer then and the police will come to shoot you.
If you pirated in a system (blasting yellow cargo ships), the police will probably appear near the station. You can only dock manually then if you manage to survive.
Buy a fuel scoop soon and collect cargo canisters when you blast an enemy. Get precious cargo for free. A simple Sidewinder worth 5 credits of bounty might turn into a 150 credits fortune if you sell its cargo of machinery or computers.
Avoid selling firearms, slaves and narcotics at friendly worlds. Feudal or Anarchy won’t care.
Safest worlds are either democracy or corporate state. Less pirates will attack you on your way.
Always use the ID feature of your gun sight to check who is attacking you.
Blast Thargoids and Wolf MKII first if you detect any in a formation.
The cargo hold expansion is a must-have for any privateer scooping up cargo.
If you want to buy goods yourself, check your planned destination first to decide which goods to buy. Food won’t sell on an agricultural world
Save early, save often!
The Atari ST version offers RAMSAVE which is rather quick. Use it if playing on a real machine, just don’t forget to save to disk before switching the machine off.
Wenn man weiß wie, funktioniert auch die Atari ST Emulation mit Recalbox ganz anständig.
Ich habe z.B. Nebulus, Pacmania und Bubble Bobble aus der Menüreihe von Automation damit zum Laufen bekommen.
TOS ROM Images müssen im BIOS Ordner installiert werden. Der Emulator erkennt die Images über Checksummen, daher funktioniert es mit EmuTOS leider nicht.
Für den Start sollten ein TOS 1.02 oder 1.04 ausreichen. Vermutlich funktionieren UK Varianten am ehesten.
Die Bedienung ist etwas gruselig mit Controller, Spiele, die die Maus benutzen, sind praktisch unspielbar.
Alles was mit Joystick und vielleicht einer Taste auskommt, sollte aber laufen.
Folgende Hilfen beziehen sich auf einen XBOX 360 Controller.
Start aktiviert das von Hatari bekannte Konfigurationsmenü. Der Mauscursor ist dann mit dem Pad steuerbar.
Select am Controller schaltet das Gamepad zwischen Joystick und Mausmodus um.
Mit L1 kann man einblenden, was gerade aktiv ist.
Mit Y wird eine virtuelle Tastatur ein- und ausgeblendet. Das reicht um kurze Menüauswahlen zu treffen oder Trainermodi zu konfigurieren.
Funktionsfähig sind .ST und .MSA Images. Manche .STX Images funktionieren, aber nicht alle.
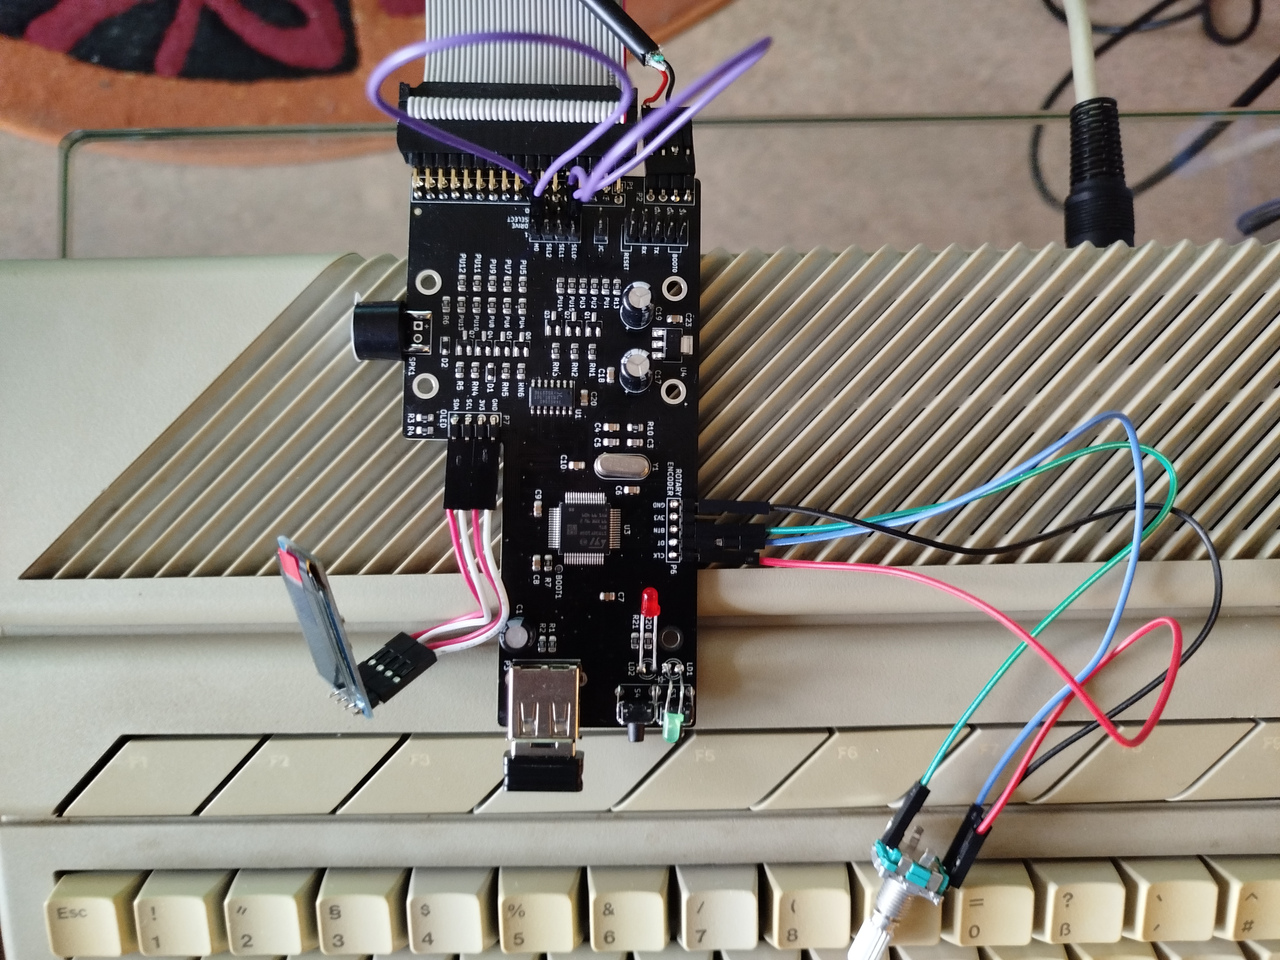
Seit ein paar Wochen arbeite ich an einem kleinen Mikrocontrollerprojekt.
Zum letzten Summer Games in Atzenhofen hatte ich für Janina vergessen, ein passendes Gamepad zum C64 mitzubringen. Mit einem klassischen Joystick kann sie nicht so recht zocken und bevorzugt Gamepads. Die Sega Pads funktionieren nur wackelig und teilweise und am C64 teils garnicht.
SNES2DB9 Arduino Prototyp am Atari STE
Zunächst wollte ich nur eine neue Leiterplatte entwerfen, mit der man ein USB Joypad auf den DB9 Joystickanschluß von Atari anpassen konnte. Das erschien mir ein wenig zu ambitioniert, also entschied ich mich, einen aktiven Konverter auf mit Arduino als Basis zu entwerfen. Ich entschied mich für die SNES Controller mit Schieberegister, da dies leicht abzufragen ist und die Handhabung der SNES Controller bei meiner Zielgruppe bekannt sind.
Heute habe ich meinen Prototypen dann mal am Atari STE ausprobiert, und ich muss sagen, es läuft. Es fehlen noch ein paar Feinheiten, Autofeuer, Springen mit Feuerknopf statt hoch, aber prinzipiell liest der Arduino den SNES Controller korrekt und mit ca 60Hz aus und bedient die Signalleitungen zum DB9 Joystickport entsprechend. Die Schaltung ist auch ziemlich einfach, mehr oder minder direkt verdrahtet, wobei ich dem Latch und Clock zum SNES Controller noch Pulldown, bzw Pullupwiderstände verpasst habe. Auch lassen sich Arduino und SNES Controller komplett über die 5V vom Joystickport versorgen.
Eine komplette Version mit eigenständigen Controller auf Basis eines ATTiny mit 14 Pin ist in Planung.
Quellcodes und Dokumentation werde ich recht bald bei Github unter MIT Lizenz verfügbar machen.
uIPTool is great to allow easy access to Atari ST files via network without having to configure complete NFS or FTP setups.
As I ran into network problems and had to manually restart the tool from time to time, I wrote a small utility that allows to tweak the AUTO boot sequence to run uiptool either once or in a repeating fashion.
In the latter mode, the tool is restarted after crashing or undesired termination (e.q. I accidentally hit SPACE on the Falcon keyboard and the tool stopped amidst in a 50MB download)
Abstract
This is a utility for the Atari ST AUTO folder.
It allows to run the uIPTool (https://bitbucket.org/sqward/uip-tools)
at system startup without having to manually click on the desktop.
Place it in AUTO folder before running MiNT/MagiC or any network stacks like STING.
System requirements
– Atari ST or compatible computer
– uIPTool and a compatible Atari NIC (Netusbee, Hydra)
Installation
1. copy uIPTool as UIP.TOS in the root of your boot drive
2. place STARTUIP.PRG in your AUTO folder (preferrably at the beginning)
3. reboot
Operation
– The tool waits until 5s timeout for keyboard input.
– If there is no keyboard input, the AUTO boot sequence is resumed.
– Press ‘U’ to activate uIPTool once. Boot continues after its termination.
– Press ‘R’ to activate uIPTool in repeating mode.
## Repeating mode
In repeating mode uIPTool is started.
When the tool crashes or terminates, the user can quit and resume the
system boot sequence if desired.
After a small timeout of 5s uIPTool will start again.
I had troubles on my LAN with lossing connection and it was tedious
to restart uIPTool by hand in these cases.
Um klassische Joysticks nach Atari Standard mit DB9 Anschluß an moderne PCs anschließen zu können, benötigt man Adapter.
Solche gibt es als freie Designs zum Nachbauen, aber selten fertig zu kaufen. Sie enthalten meist einen kleinen Microcontroller, häufig AVR oder PIC, etwas “Hühnerfutter” drumrum und stellen PC seitig eine HID konforme Schnittstelle bereit.
Bei Ebay und anderen Shops tauchen ab und an fertig kaufbare Geräte auf. Diese braucht man in der Regel nur anschließen und gängige Betriebssysteme listen danach einen neuen Joystickanschluß auf.
Ich besitze aktuelle mehrere solcher Adapter. Bei einem konnte ich über eine in der Firmware hinterlegte URL auch eine Bezugsquelle in Kanada ausmachen. Zwar nicht die günstigste Variante, aber immerhin eine Möglichkeit, einen solchen Adapter zu beschaffen. Meinen hatte ich bei Ebay gefunden.
Auszug aus meinem Linux Kernel Log beim Einstecken:
[ 5870.324066] usb 1-5.1.3: new low-speed USB device number 9 using xhci_hcd

[ 5870.453974] usb 1-5.1.3: New USB device found, idVendor=1781, idProduct=0a99

[ 5870.453980] usb 1-5.1.3: New USB device strings: Mfr=1, Product=2, SerialNumber=3

[ 5870.453982] usb 1-5.1.3: Product: Retro Joystick Adapter v2.0

[ 5870.453984] usb 1-5.1.3: Manufacturer: retronicdesign.com

[ 5870.453986] usb 1-5.1.3: SerialNumber: 3292

[ 5870.462639] input: retronicdesign.com Retro Joystick Adapter v2.0 as /devices/pci0000:00/0000:00:14.0/usb1/1-5/1-5.1/1-5.1.3/1-5.1.3:1.0/0003:1781:0A99.0008/input/input17

[ 5870.520437] hid-generic 0003:1781:0A99.0008: input,hidraw5: USB HID v1.01 Joystick [retronicdesign.com Retro Joystick Adapter v2.0] on usb-0000:00:14.0-5.1.3/input0
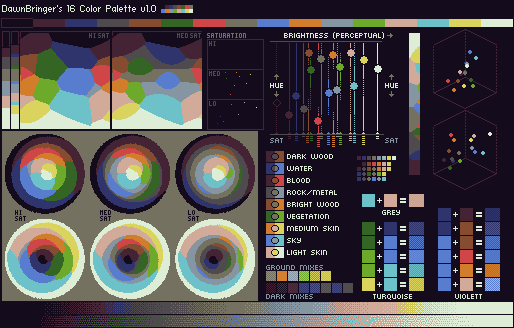
Da Forumposts ab und an verschwinden und ich diesen Zusammenhang für sehr interessant befinde, eine Kopie hier in mein Blog von DawnBringer bei pixeljoint.com:
“So, dear friends, I have wasted some time lately with my obsession for
palettes. It’s been tackled before but I felt there was (and is?) more
work to be done with designing a great multi-purpose 16 color palette
(I’ll avoid any talk of “perfect” or “ultimate” as there simply isn’t
such a thing for a limited palette).
Property wish-list:
* Archetypical colors common in games/pixelart
* Real world colors (RGB-space brightness-axis “colorcigarr”)
* Good coverage of the spectrum
* Great coverage of the brightness range (a must for any useful palette)
* Max combinatory possibilities: Interpolations, simulations, dithers etc.
* …and if possible; colors that may work as subtle varitations: rust, dirt, textures.
But as with all small palettes, some things had to be sacrificed: This
palette is very weak in magentas (as that is a rarely used area). It
also lack much in turquoise – but at least they can be simulated by
combining the many blues & greens.
This is public version 1.0 (v9843.7 to me )
DawnBringer’s 16 Col Palette v1.0
Some notes:
* The dark register is dominated by blue/violett commonly found in shadows/dark waters etc.
* The lower-medium register has the weight on green and browns; found in vegetation, wood etc.
* The upper-medium register has much blues and orange/pink to handle skies, sand and skin.
* The bright register has the lone yellow and the effective pink &
cyan that are complimentary colors that span around the spectrum and
can be mixed to a very good grey!
* Red is slightly violett – I wanted a red that contrasted the other
colors rather than being another shade of brown/orange. Still good
enough to use in some skin-shades I hope.
— Mockups omitted —-
Outstanding issues:
* The optimal(?) global brightness/contrast level…these can be
adjusted quite easily without affecting the internal relationships of
the colors very much – so if you have any feelings about this lemme
know.
* The dark register: is there a better combination/structure of colors here?
int ist short, d.h. 16.bit (aber statt int ist eh stdint.h zu verwenden)
MinTLib wird nicht verwendet (d.h. keine Standard C Libraryfunktionen, aber die TOS Bindings sind da und voll funktionsfähig, ausserdem wird das Binary schön klein)
eigener Startupcode (hier von Markus Fröschle geklaut und um den Initcode von Leonard/Oxygene ergänzt)
Letztere sind für mich als Spiele und Demoentwickler interessant, da ich nicht immer 70K unixoide Library dazulinken möchte.
Die Compilerflags kann man natürlich ggfs für den Atari Falcon 030 oder die Firebee passend modifizieren.
Fehlt nur noch ein passendes Projekt, der erzeugte Code mit reinem C ist übrigens nah dran an handgeschriebenem Assembler. Nur echte ST Codingcracks werden besseren Assemblercode schreiben können als das, was hier ein relativ aktueller gcc erzeugt.
Vielen Dank an Vincent Riviere für die Toolchain und Markus Fröschle für praktisches Knowhow, ohne die Mintlib kleine effiziente Executables für den ST zu erzeugen.
Ich bin selbst stark erstaunt über die echt gute Performance, trpotz des landläufig als lahm verschriehenen sogenannten Truecolorgrafikmodus des Falcons (16Bit mit 5-6-5 Muster pro Pixel). Mich persönlich motiviert das, evtl auch eher auf Spiele für den Falcon zu setzen, wenn ich denn mal wieder privat Lust und Laune verspüre. Langsames Technologiesammeln läuft, aber bis zu einem fertigen Spiel ist es noch ein Weg. Immerhin lockt mich dieser Release, selber mal wieder etwas zu programmieren. Die Technik mit den “compilierten Sprites” habe ich mir schon mal abgeschaut, mein Generator ist da allerdings noch nicht so optimiert, wie der hier in Racer verwendete.
Immerhin, in der Atari Szene gibt es noch Bewegung!

 I add).
")
")